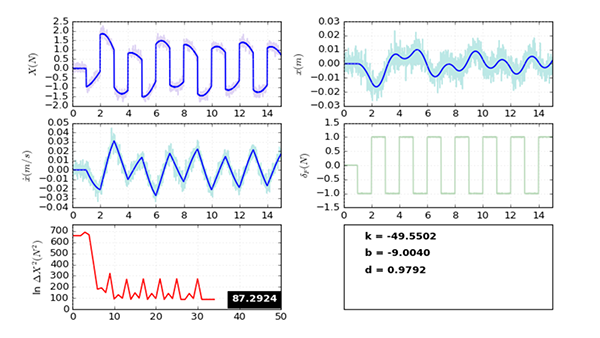
>>> The Blog of Rog

Not frog.

SLAM (HTML5/Processing)

I thought I should post something on an area I’ve been working in more recently, so here is my simulation of the Simultaneous Localisation and Mapping (SLAM) technique, as applied to an autonomous vehicle navigating through waypoints across a feature-rich terrain.

Click through to see the simulation in action!

CH47B + MMS X3D (HTML5) Simulation

Managed to export my VRML simulation to X3D, and embed it here with the HTML5 X3DOM Framework. Note that you will need to use a supported browser in order to view the model. Click on the image below to view the model in action:

More HSL Simulations

I dug up some more old VRML simulation replays created some time ago. These ones demonstrate the dynamic response of CH-47B Chinook and UH-1H helicopters with externally slung loads undergoing a either simple disturbance or manoeuvre. The coupled-body dynamic simulation was performed in Matlab and then exported to VRML for visualisation.

Note the browser/plugin requirements in my previous post.

wxPython & Pyro

Building on my simple wxPython multiprocessing example, I’ve extended the design to implement a distributed computing architecture, using Pyro.

The client, dispatcher and worker scripts are all listed here.

1
2
3
4
5
6
7
8
9
10
11
12
13
14
15
16
17
18
19
20
21
22
...
class TaskServerPyro(TaskServerMP):
    """
    The TaskServerMP class provides a target worker class method for queued processes.
    """
    def __init__(self, tasks=[ ]):
        """
        Initialise the TaskServerMP and create the dispatcher.
        """
        TaskServerMP.__init__(self, numprocesses=0, tasks=tasks)

        # Create the dispatcher
        self.dispatcher = Pyro.core.getProxyForURI("PYRONAME://:wxSimple.dispatcher")

        self.numprocesses = self.dispatcher.getNumWorkers()
        self.PIDs = self.dispatcher.getWorkerPIDs()

        # The empty processes are instantiated here
        for n in range(self.numprocesses):
            process = EmptyProcess(self.PIDs[n])
            self.Processes.append(process)
...

wxPython & Multiprocessing

Now that the multiprocessing library comes standard in Python 2.6, I thought I’d migrate some of my apps to take full advantage. However, there aren’t many examples out there showing how to write a basic multiprocessing program with a graphical front-end.

in order to prototype the program design, I wrote a simple wxPython script, listed in full here.

1
2
3
4
5
6
7
8
9
10
11
12
13
14
15
16
17
18
19
20
21
22
23
24
25
26
27
28
29
30
31
32
33
34
...
    def processTasks(self, resfunc=None):
        """
        Start the execution of tasks by the processes.
        """
        self.keepgoing = True

        self.timeStart = time.time()
        # Set the initial process time for each
        for n in range(self.numprocesses):
            pid_str = '%d' % self.processes[n].pid
            self.processTime[pid_str] = 0.0

        # Submit first set of tasks
        if (self.numprocesses == 0):
            numprocstart = 1
        else:
            numprocstart = min(self.numprocesses, self.numtasks)
        for self.i in range(numprocstart):
            self.task_queue.put(self.Tasks[self.i])

        self.j = -1
        self.i = numprocstart - 1
        while (self.j < self.i):
            # Get and print results
            output = self.getOutput()
            # Execute some function (Yield to a wx.Button event)
            if (isinstance(resfunc, (types.FunctionType, types.MethodType))):
                resfunc(output)
            if ((self.keepgoing) and (self.i + 1 < self.numtasks)):
                # Submit another task
                self.i += 1
                self.task_queue.put(self.Tasks[self.i])
...

SimData - VRML

Just tidied up my VRMLtrace python program. This script converts any simulation/pose data (position+orientation) into a VRML model for visualisation. It uses a template file, a VRML model of the vehicle and a data file to generate the VRML. More details are on the page.

1
2
3
4
5
6
7
8
9
10
11
12
13
14
15
16
17
18
19
20
21
22
23
...
      # Generate the key array
      key = [ k/(self.N - 1.0) for k in range(self.N) ]
      self.d['KEY'] = " %8.4f"*self.N % tuple(key)
      # Initial helicopter rotation & translation
      self.d['HELI_ROT_0'] = "%8.4f %8.4f %8.4f %8.4f" % tuple(self.a2v(v))
      self.d['HELI_TRANS_0'] = "%8.4f %8.4f %8.4f" % tuple(self.a2v(r))

      af = 0.0
      ar = 0.0
      # Loop through each frame
      for i in range(self.N):
         x = self.X[i]
         q = self.e2q(x[3:6])
         v = self.q2v(q)
         r = x[0:3]
         # Intermediate helicopter rotation & translation
         self.d['HELI_ROT'] += "%8.4f %8.4f %8.4f %8.4f,\n" % tuple(self.a2v(v))
         self.d['HELI_TRANS'] += "%8.4f %8.4f %8.4f,\n" % tuple(self.a2v(r))
         # Intermediate forward & aft rotor rotations
         self.d['FWDROT_ROT'] += "%8.4f %8.4f %8.4f %8.4f,\n" % (0.0,1.0,0.0,af)
         self.d['AFTROT_ROT'] += "%8.4f %8.4f %8.4f %8.4f,\n" % (0.0,0.0,1.0,-ar)
...

CH47B + MMS VRML Simulation

This is an old VRML simulation replay I created back when I worked in the Helicopter Flight Dynamics group at DSTO, Melbourne. It demonstrates the dynamic response of a CH-47B Chinook helicopter with an externally slung Medium Maintenance Shelter (MMS) load undergoing a simple manoeuvre. The coupled-body dynamic simulation was performed in Matlab and then exported to VRML for visualisation. More details are available in my report.

You will need a VRML Plugin to view the model. On Windows, ParallelGraphics Cortona 3D Viewer works very well.

If you are using OS X Safari with the FreeWRL plugin, be warned that clicking the following link, which contains the embedded VRML, may hang your system! I have not had any such problems under Windows :/ On a Mac, I suggest using instantplayer and loading the direct link instead.

Alternatively, you can see a video animation of model here.

Convert_frames

This small perl script is really just an example of using Image::Magick to crop and convert a sequence of images to prepare them for insertion into a video file. I used it for my PyODE Example. You could easily write this as a one-line command if desired.

1
2
3
4
5
6
7
8
9
10
11
12
13
14
15
16
17
18
19
20
21
22
23
#!/usr/bin/perl
#
# convert_frames

use Image::Magick;

$imgdir = "frames";
$prefix = "pyode_ex3";

$| = 1;

while ($infile = <$imgdir/$prefix.*.tif>) {
    print "$infile -> ";
    ($outfile = $infile) =~ s/\.tif$/.png/;

    $image = Image::Magick->new;
    $x = $image->Read($infile); warn "$x" if ($x);
    $x = $image->Crop(geometry=>'640x360+0+30'); warn "$x" if ($x);
    $x = $image->Write($outfile); warn "$x" if ($x);

    unlink($infile);
    print "$outfile \n";
}